


常用的 Linux Shell ,R 命令/脚本和报错解决方法
添加用户,改密码,改权限
#添加用户组dev
groupadd dev
#添加libb用户,并归属于dev组
useradd -g dev libb
#给libb用户改密码
passwd libb
##更改文件权限
chown -R user:group filename
chown -R wt wt/ ##改变文件主
chmod -R 741 wt/ ##3个数字分别表示User、Group、及Other的权限。 r=4,w=2,x=1
##查看用户
cat /etc/passwd|grep -v nologin|grep -v halt|grep -v shutdown|awk -F":" '{ print $1"|"$3"|"$4 }'|more
动态库无法载入
有时候在 R 里面加载包会出现下面的报错:
Error: package or namespace load failed for ‘NeoEnrichment’ in dyn.load(file, DLLpath = DLLpath, ...): unable to load shared object '/home/public/R/library/Rsamtools/libs/Rsamtools.so': /lib64/libstdc++.so.6: version `GLIBCXX_3.4.20' not found (required by /home/public/R/library/Rsamtools/libs/Rsamtools.so)
##错误提示在/lib64/libstdc++.so.6中无法找到GLIBCXX_3.4.20,所以先检查一下/lib64/libstdc++.so.6 链接的库
strings /usr/lib64/libstdc++.so.6 | grep GLIBCXX
GLIBCXX_3.4
GLIBCXX_3.4.1
GLIBCXX_3.4.2
GLIBCXX_3.4.3
GLIBCXX_3.4.4
GLIBCXX_3.4.5
GLIBCXX_3.4.6
GLIBCXX_3.4.7
GLIBCXX_3.4.8
GLIBCXX_3.4.9
GLIBCXX_3.4.10
GLIBCXX_3.4.11
GLIBCXX_3.4.12
GLIBCXX_3.4.13
GLIBCXX_3.4.14
GLIBCXX_3.4.15
GLIBCXX_3.4.16
GLIBCXX_3.4.17
GLIBCXX_3.4.18
GLIBCXX_3.4.19
GLIBCXX_DEBUG_MESSAGE_LENGTH

##然后再在别的地方找找有么有
sudo find / -name "libstdc++.so.6*"

##检查一下
ll 有需要版本的GLIBCXX的库
##将有需要版本的GLIBCXX的库替换掉/lib64/libstdc++.so.6就行了
参考:搞定 libstdc++.so.6: version `GLIBCXX_3.4.21' not found_phd的专栏-CSDN博客
安装 miniconda 和 mamba
wget https://mirrors.tuna.tsinghua.edu.cn/anaconda/miniconda/Miniconda3-py39_4.9.2-Linux-x86_64.sh
bash Miniconda3-py39_4.9.2-Linux-x86_64.sh
##重启
conda install mamba -n base -c conda-forge
mamba install -c conda-forge htop
conda create -n your_env_name python=x.x
设置 history 文件显示时间
更改前:

更改:
##显示时间
HISTTIMEFORMAT="%d/%m/%y %T "
source ~/.bash_profile
##命令数量
HISTFILESIZE=100000
# append to the history file, don't overwrite it
shopt -s histappend
更改后:

不改变时间戳移动文件
不改变时间戳(创建,更改文件的时间)在服务器间移动文件:
scp -p
安装 HDF5Array 编译错误
报错: cannot find -lcrypto:
/usr/bin/ld: cannot find -lcrypto
collect2: error: ld returned 1 exit status
make: *** [HDF5Array.so] Error 1
ERROR: compilation failed for package ‘HDF5Array’


[root@localhost ~]# ll /usr/lib64/libssl*
-rwxr-xr-x 1 root root 387696 Apr 28 09:40 /usr/lib64/libssl3.so
lrwxrwxrwx 1 root root     16 Jun  2 01:56 /usr/lib64/libssl.so.10 -> libssl.so.1.0.2k
-rwxr-xr-x 1 root root 470376 Dec 16  2020 /usr/lib64/libssl.so.1.0.2k
[root@localhost ~]# ln -s /usr/lib64/libssl.so.1.0.2k /usr/lib64/libssl.so
[root@localhost ~]# ll /usr/lib64/libssl*
-rwxr-xr-x 1 root root 387696 Apr 28 09:40 /usr/lib64/libssl3.so
lrwxrwxrwx 1 root root     27 Jul 20 01:42 /usr/lib64/libssl.so -> /usr/lib64/libssl.so.1.0.2k
lrwxrwxrwx 1 root root     16 Jun  2 01:56 /usr/lib64/libssl.so.10 -> libssl.so.1.0.2k
-rwxr-xr-x 1 root root 470376 Dec 16  2020 /usr/lib64/libssl.so.1.0.2k
[root@localhost ~]# ln -s /usr/lib64/libcrypto.so.1.0.2k /usr/lib64/libcrypto.so
释放 swap 内存:
sync
swapoff -a
swapon -a
free -m
Win10 右键添加新建 markdown 文件
新建一个 txt 文件,填入以下内容:
Windows Registry Editor Version 5.00

[HKEY_CLASSES_ROOT\.md]
@="markdown"

[HKEY_CLASSES_ROOT\.md\ShellNew]
"NullFile"=""

[HKEY_CLASSES_ROOT\markdown]
@="Blank Markdown file"
然后把后缀改成 .reg 双击 一路点是 就可以了
xargs命令
使用管道可以方便地将一个命令的输出作为下一个命令的输入,但是有些命令并不支持管道输入,如ls,mkdir等,这时就可以用xargs命令。
xargs可以接受文件或者命令的输出,将其传递给其他命令,默认是echo;xargs可以将多行的输出转化成一行,这就是其可以将输出传递给其他命令的基础(当然也可以用不同的参数得到不同格式的输出),看几个例子:
xargs和wc
ls *.gtf | xargs wc -l
 42252 1-6.gtf
   42252 1.gtf
       8 test.gtf
   84512 total

##ls 将后缀为gtf的文件名给xargs ,xargs将这些文件名传给wc作为其参数
使用-p选项,在执行的时候会询问
 echo 'one two three' | xargs -p touch
 # touch one two three ?...y
使用-I选项,执行多个命令
-I后面跟一个字符,在后面的命令中出现相同的字符会被替换掉:
cat directories.txt | xargs -I [ echo [ ## [也可以是其他字符
如果我们要同时执行多个命令,可以使用sh -c:
cat directories.txt | xargs -I [ sh -c 'echo [;mkdir ['
用这个我们可以改变xargs传递的参数的位置(默认是最后一个参数):
ls *.jpg | xargs -n1 -I {} cp {} /data/images ##将当前目录下的所有jpg文件复制到/data/images
使用-n选项,复制文件到多个位置
-n后面接数字,表示一次传递的参数的数目。
 echo ./dir_one/ ./dir_two/ | xargs -n 1 cp -v *.gtf ##-v 报告复制过程
 '1-6.gtf' -> './dir_one/1-6.gtf'
'1.gtf' -> './dir_one/1.gtf'
'test.gtf' -> './dir_one/test.gtf'
'1-6.gtf' -> './dir_two/1-6.gtf'
'1.gtf' -> './dir_two/1.gtf'
'test.gtf' -> './dir_two/test.gtf'
结合find使用
用 rm 删除太多的文件时候,可能得到一个错误信息:/bin/rm Argument list too long,用 xargs 去避免这个问题:
find . -type f -name "*.log" -print0 | xargs -0 rm -f
如何将和文件夹同名但是有后缀的文件一次全部移动到相应的文件夹

如何将.pbs文件一次全部移动到相应的文件夹,cancer文件中是这些pbs的名字,是下面的命令产生的:
for i in ./*.pbs ;do basename $i;done > cancer
由于xargs默认将结果作为下个命令的最后的参数,所以:
cat cancer |while read i;do basename $i .pbs | xargs -n 1 mv $i;done
一次得到所有癌症类型的样本名
我的所有癌症的maf文件都存在一个相应的文件夹中,怎么将这些文件夹中的样本名提取出来,就是去掉后缀名,对一个癌症可以这样做:
for i in ./luad/*;do basename $i .maf;done > luadsample.txt
批量做:
#!/bin/bash

for i in /public/home/wangshx/wt/tcga_pancancer_dcc_mafs_082115/mafs/maf/*
do
   for j in $i/*
   do
     basename $j .maf >> $(echo $i.txt)
   done
done
遍历文件每一行进行操作
cat success_submitted_list.txt |while read i ;do mv $i ./02 ;done
提取文件名并去掉后缀
for i in ./luad/*;do basename $i _out.txt;done > sample
grep匹配
grep的基本模式是:grep 'pattern' file_to_search 并且会打印出匹配上pattern的行
gerp常用的参数有:
-
grep -w匹配整个字符:echo 'my dog is brown' > sample.txt grep -w 'dog' sample.txt ##my dog is brown grep -w 'do' sample.txt ##not output -
grep -i匹配时大小写不敏感 -
grep -v返回不匹配的行 -
grep -o只返回匹配的字符,而不是一整行 -
grep -c对匹配的行进行计数,相当于:grep 'pattern' file | wc -l -
一些参数返回匹配行的前/后行:
grep -A [n]返回匹配的行和之后的n行grep -B [n]返回匹配的行和之前的n行grep -C [n]返回匹配的行和之前的n行,之后的n行
-
grep -f后面可以接一个文件,里面有多个要匹配的模式,一个模式一行,也就是:grep -f patterns.txt file.txt
grep -v "#" 1.gtf | grep -v "^$" | wc -l ##除去注释行和空行之后的行数,因为`$`是行尾的标记
grep -v '^#' 1.gtf | awk '{print $3, $5-$4+1}' | head ##计算每种特征的长度
gene 1152
transcript 1152
exon 1152
CDS 1149
start_codon 3
stop_codon 3
gene 75
transcript 75
exon 75
CDS 72
grep -v '^#' 1.gtf | awk '{print $3}' | sort | uniq -c ##这个就是看gtf文件中的feature类型的数量
   7050 CDS
   7553 exon
   7126 gene
   6700 start_codon
   6692 stop_codon
   7126 transcript
找出文件2中有而文件1中没有的行:
grep -vf file1 file2
文件上下翻转和左右翻转
-
tac文件上下翻转,也就是第一行变为最后一行,第二行 变成倒数第二行##首先创建一个文本 touch taccommand vi taccommand #first #second #third cat taccommand | tac #third #second #first ##我们也可以直接输入文本,使用<<命令 cat <<END | tac##<<后接的就是终止符,这种方式并不创建一个文本 -
rev将每列反转,也就是将第一个字符变成最后一个cat <<a | rev #> abcde #> xyz #> a #edcba #zyx
使用rename批量重命名
touch test1.fa test2.fa
rename 'test' 'new' test*.fa

##批量提取一定长度的文件名,不改变后缀,重命名
for i in *.pbs ; do rename `basename $i .pbs` `echo ${i:0:8}` $i ;done

#也可以使用
rename 's/names/replace/' file
一些有用的快捷操作
- ! 加之前输入过的命令的前几个字母,快速获取前面的命令
- 回到命令的行首可以用
ctrl a或者home键,回到行尾可以用ctrl e或者end键;比如我写好一个命令但是却不想运行了可以回到行首加上#再回车 !!表示上一条命令- 替换上一个命令中的字符,再运行一遍命令,用于需要对多个文件执行同样的命令,又不想写循环的情况,使用
:gs(global substitute)如:!!:gs/test1/test2将上一条命令中的test1替换成test2再运行一次
标准输入,标准输出与标准错误
主要是3个符号:< > -;标准输出与标准错误都是输出到屏幕上的;可以用> 将标准输出重定向到某个文件;2 >&1 将标准错误重定向到标准输出,如果已经将标准输出定向到某个文件,那么这个命令可以将标准错误与标准输出定向到一个文件(Linux 终端用 2 表示标准错误,1 表示标准输出);<表示标准输入 后面接可以产生输出的命令 可以将输出转为输入;也可以用-表示标准输入,下面看一个例子:
##我们先写一个脚本
#!/bin/bash
echo "i am std output"
unexisted_command

bash stdout_error.sh
#i am std output,这个就是标准输出
#stdout_error.sh: line 4: unexisted_command: command not found,这个就是标准错误

bash stdout_error.sh > stdout_error.stdout##将标准输出重定向到文件,但是标准错误还会在屏幕上显示
bash stdout_error.sh > stdout_error.stdout 2> stdout_error.stderr#将输出和错误都重定向到文件,注意2和>之间没有空格
bash stdout_error.sh > stdout_error.stdout 2>&1 ##将输出和错误重定向到一个文件

cat <<END | diff - <(echo "1 2 3" | tr ' ' '\n') ##diff有两个输入,一个是上一个命令的输出,一个是<后的输出,tr是用来替换字符的
解压
zip
解压用unzip ,压缩用zip
gz
解压用gunzip,压缩用gzip
tar.gz
一些参数:
-c压缩-x解压-t查看压缩包的文件名-z指定.gz-f指定压缩和解压缩的文件名
tar -zcv -f cp_folder.tar.gz cp_folder       #打包压缩文件夹(gzip格式)

tar -ztv -f cp_folder.tar.gz                 #查看压缩文件夹中的文件名(gzip格式)

tar -zxv -f cp_folder.tar.gz                 #打开包并解压缩(gzip格式)
bz2
压缩:bzip2;解压:bunzip2
也可以用tar 使用-j参数调用bzip,如:
tar -xjf a.tar.bz2
文件操作
文件生成
seq()生成序列
seq 1 10 ##默认分割符为换行符\n
1
2
3
4
5
6
7
8
9
10
seq -s " " 1 2 10 #也可以指定分隔符和步长
1 3 5 7 9
cat <(seq 0 3 17) <(seq 3 6 18) > text##用标准输入和标准输出
0
3
6
9
12
15
3
9
15
文件排序
使用sort进行排序,常用参数有:
-n数值排序-r逆序-c检测文件是否已经排序-k指定使用哪几列排序-m合并排序好的文件-u删除重复行
sort test ##直接排序
1
12
13
14
14
15
16
2
24
3
35
4

 sort -n test ## 按照数值排序
1
2
3
4
12
13
14
14
15
16
24
35

sort test > on_test
sort -n test > n_test

sort -cn on_test ##注意用cn就表示检查是否按照数值排序的
#sort: on_test:9: disorder: 2
sort -cn n_test ##没有输出,表示排序了

sort -nu test
sort -n test | uniq##两种相同,都是将重复元素去掉
1
2
3
4
12
13
14
15
16
24
35

sort -n test | uniq -d##获取重复的行
14

sort -n test | uniq -c ##获取重复的行重复的次数
      1
      1 1
      1 2
      1 3
      1 4
      1 12
      1 13
      2 14
      1 15
      1 16
      1 24
      1 35
一个例子,fasta序列提取
cat test.fasta
>SOX2
ACGAGGGACGCATCGGACGACTGCAGGACTGTC
>POU5F1
ACGAGGGACGCATCGGACGACTGCAGGACTGTC
>NANOG
CGGAAGGTAGTCGTCAGTGCAGCGAGTCCGT

##提取含有SOX2的序列信息
grep -A 1 "SOX2" test.fasta
>SOX2
ACGAGGGACGCATCGGACGACTGCAGGACTGTC
##-A 1表示输出匹配的行和其后一行after
也可以用awk来操作:
awk 'BEGIN{OFS=FS="\t"}{if($0 ~ />/) {name=$0;sub(">","",name);}\
else seq[name]=$0;}END{print ">SOX2"; print seq["SOX2"]}' test.fasta

##$0 ~ />/ ~表示模式匹配的运算符,看这一行里面有没有>
##sub 是进行替换的:sub(要替换的部分,要替换成的部分,要替换的字符串
##seq[name] 相当于一个字典,name就是key
判断某个文件夹下是否有某个文件名(在一个文件中),如果有将其移动到另一个文件夹
首先要对含有文件名的文件进行遍历:
cat all.txt |
while read file_name;
do
...
done
然后判断是否有某个文件
#!/bin/bash
cat SRR_Acc_List.txt |
while read file_name
do
	if [ -e ./fastq_gz_2/${file_name}_1.fastq.gz ]
	then
		mv ./fastq_gz_2/${file_name}_1.fastq.gz ./liu_2019
	else
		echo "not exist: $file_name"
	fi
done
判断文件夹下是否有某个后缀的文件:
for i in ./SRR*/;do file=$(ls $i/*.tmp 2>/dev/null | wc -l);if [ $file != 0 ];then echo $i;fi;done ##判断是否有后缀为tmp的文件
删除空文件夹
#!/bin/bash

for i in ./SRR*
do
a=$(ls $i | wc -l)
if [ $a -eq 0 ]
then
    rm -rf $i
fi
done
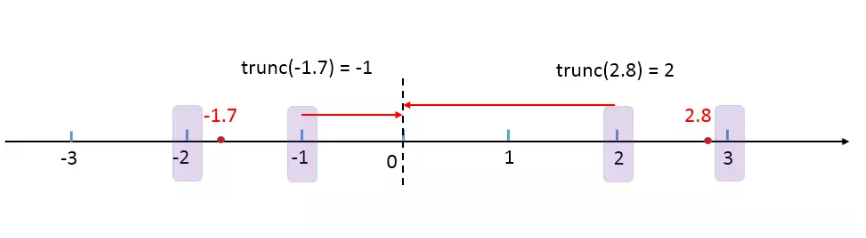
几个取整函数:ceiling ; floor ; trunc ; round; signif
ceiling 返回不小于该数字的最小整数,即向上取整
floor 返回不大于该数字的最大整数,即向下取整
trunc 返回距离0最近的整数,即向零取整
round 采取四舍六入五成双的原则:
<=4舍去>=6进一位- 五成双:
- 当5后面有数字的时候,舍5进一位
- 当5后面没有数字的时候:
- 当5前一位为奇数时,舍5进一位
- 当5前一位为偶数时,舍5不进位
round也可以指定保留小数点的位数:round(x,digits=0)
signif 保留有效数字,signif(x,digits=6) 默认保留6位
安装github上的包
首先使用devtools来安装:
devtools::install_github("gadenbuie/regexplain")
结果报错,应该是网不行:
Error: Failed to install 'unknown package' from GitHub:
  Timeout was reached: [api.github.com] Resolving timed out after 10000 milliseconds
上github将包的zip下载下来,用devtools的本地安装:
devtools::install_local("~/packages/regexplain-master.zip")
还是不行:
Error: Failed to install 'regexplain-master.zip' from local:
  Timeout was reached: [api.github.com] Resolving timed out after 10000 milliseconds
只能用一般的本地安装包的方法:先解压
install.packages("~/packages/regexplain-master/",repos=NULL,type="source")
配置国内 R镜像
使用 usethis::edit_r_profile() 打开 .Rprofile, 然后在末尾添加相应的镜像。
南大:
options(BioC_mirror="https://mirror.nju.edu.cn/bioconductor")
options("repos" = c(CRAN="https://mirror.nju.edu.cn/CRAN/"))
清华:
options(BioC_mirror="https://mirrors.tuna.tsinghua.edu.cn/bioconductor")
options("repos" = c(CRAN="https://mirrors.tuna.tsinghua.edu.cn/CRAN/"))
中科大:
options(repos = c(USTC="https://mirrors.ustc.edu.cn/CRAN/"))
如果改了镜像安装包时还是会出现下载失败,可以尝试修改 download.file.method (Rprofile):
options(download.file.method="libcurl")##添加到.Rprofile
翻转字符串
参考:https://www.r-bloggers.com/four-ways-to-reverse-a-string-in-r/
翻转字符串是一项常见的操作,比如我们想要找与一条DNA序列的互补序列就需要用到翻转
先生成一个短序列:
set.seed(1)
dna <- paste(sample(c("A", "T", "C", "G"), 10,
                    replace = T), collapse = "")
第一种方法:先用strsplit()将序列拆分成单个字符向量,再用rev()翻转向量,最后用paste()连起来:
start <- proc.time()
splits <- strsplit(dna, "")[[1]]
reversed <- rev(splits)
final_result <- paste(reversed, collapse = "")
end <- proc.time()

print(end - start)
#  用户   系统   流逝
#12.931  0.860 13.862
第二种方法:先用R 内置的utf8ToInt()将字符转化成整数向量,再用rev()进行翻转,最后再用intToUtf8转化成字符
utf8ToInt(c("abc"))
#[1] 97 98 99

start <- proc.time()
final_result <- intToUtf8(rev(utf8ToInt(dna)))
end <- proc.time()

print(end - start)
#用户  系统  流逝
#1.569 0.538 2.136
第三种方法就是用stringi包的stri_reverse函数进行翻转:
start <- proc.time()
final_result <- stringi::stri_reverse(dna)
end <- proc.time()

print(end - start)
# 用户  系统  流逝
#0.295 0.028 0.336
第四种方法就是使用Biostrings包里面的str_rev()函数:
if(require(Biostrings)==F){
  BiocManager::install("Biostrings")
  library(Biostrings)
}else{library(Biostrings)}
start <- proc.time()
final_result <- str_rev(dna)
end <- proc.time()

print(end - start)
# 用户  系统  流逝
#0.031 0.001 0.032
Centos7 编译安装 R
wget https://mirrors.sjtug.sjtu.edu.cn/cran/src/base/R-4/R-4.1.0.tar.gz

sudo yum install gcc-c++
sudo yum -y install gcc-gfortran
sudo yum install readline-devel
sudo yum install zlib-devel
sudo yum install bzip2-devel
sudo yum -y install xz-devel.x86_64
sudo yum install pcre pcre-devel
sudo yum install libcurl libcurl-devel
sudo yum install pcre2 pcre2-devel
sudo yum install java-1.8.0-openjdk-devel.x86_64

##安装perl
sudo yum install perl*
cpan install XML::Simple
cpan install XML::LibXML
wget https://www.cpan.org/src/5.0/perl-5.34.0.tar.gz
tar zxf perl-5.34.0.tar.gz
./Configure -des -D -prefix=/usr/local/
make
make install

sudo yum install libpng-devel
sudo yum install libjpeg-devel
sudo yum install libtiff-devel
sudo yum install libcairo-devel
sudo yum search libcair
sudo yum search cairo
sudo yum install cairo-devel.x86_64

#configure: WARNING: you cannot build info or HTML versions of the R manuals
#configure: WARNING: you cannot build PDF versions of the R manuals
#configure: WARNING: you cannot build PDF versions of vignettes and help pages
##https://stackoverflow.com/questions/24983906/configure-warning-you-cannot-build-info-or-html-versions-of-the-r-manuals
sudo yum install texinfo.x86_64
sudo yum install texlive.x86_64

#configure: WARNING: neither inconsolata.sty nor zi4.sty found: PDF vignettes and package manuals will not be rendered optimally
wget http://mirrors.ctan.org/fonts/inconsolata.zip
#解压 :
unzip inconsolata.zip
#将文件拷贝到目录下:
cp -Rfp inconsolata/* /usr/share/texmf/
#刷新sty :
mktexlsr

##最后编译安装
./configure --with-cairo --enable-memory-profiling --enable-R-shlib
            --with-blas --with-lapack --prefix=/opt/R/4.1 -with-x=no
make
make install
设置了 SSH key 但是 Github push 仍然需要密码
设置了 SSH key 但是 Github push 仍然需要密码,而 github 在 8 月 13 后只支持已 token 的形式 push:
git push origin main
Username for 'https://github.com': wt12318
Password for 'https://wt12318@github.com':
remote: Support for password authentication was removed on August 13, 2021. Please use a personal access token instead.
remote: Please see https://github.blog/2020-12-15-token-authentication-requirements-for-git-operations/ for more information.
fatal: unable to access 'https://github.com/wt12318/Blog_2.git/': The requested URL returned error: 403
需要输入密码是由于使用了 https 的 url,参考git - SSH Key - Still asking for password and passphrase - Stack Overflow,所以需要从 https 转到 ssh:
git remote -v
origin  https://github.com/wt12318/Blog_2.git (fetch)
origin  https://github.com/wt12318/Blog_2.git (push)

git remote set-url origin git@github.com:wt12318/Blog_2.git
git remote -v
origin  git@github.com:wt12318/Blog_2.git (fetch)
origin  git@github.com:wt12318/Blog_2.git (push)

git push origin main
如何将 PPT 无损转成 PDF
用 Office Powerpoint 打开 PPT (前提是电脑已经装了 Adobe Acrobat)。
首先点击 ACROBAT 插件首选项--高级设置进行设置:

接着将一般里面的对象级压缩和图像中三类图像的采样和压缩都关闭:


接着就可以确定并导出 PDF 了。一个好用的在线 PDF 编辑工具:PDF24 Tools: 免费且易于使用的在线PDF工具
如何使用 FTP 下载 ENA 的 FASTQ 数据
先安装ftp服务(centos 7):
sudo yum -y install lftp
没有权限的可以手动编译:http://lftp.yar.ru/get.html
安装好了之后就可以使用ENA上的ftp地址进行下载,比如这里的CCLE的一个细胞系的RNA-seq数据:
lftp ftp://ftp.sra.ebi.ac.uk/vol1/fastq/SRR861/006/SRR8615916 ##注意要加上ftp://
ls 一下就可以看到我们要下载的数据:

然后使用 pget 就可以进行多线程下载了:
pget -n 10 SRR8615916_1.fastq.gz
下载速度还是比较快的:

如何用 R 一次性读入一个文件夹下所有的文件并合并
先生成一些文件:
dir.create("test")
##在 test 下生成一些csv文件
df <- data.frame(
  x=c(1:100),
  y=rep(c("a","b","c","d"),each=5)
)
dt_list <- split(df, list(df$y))
for (i in names(dt_list)) {
  write.csv(dt_list[[i]], paste0("test/",i, ".csv"))
}
最直接的方法就是使用 for 循环将每个文件读入并存为 list 的一个元素,接着可以使用 dplyr 的 bind_rows 函数进行合并:
files <-  list.files("test/",pattern="*.csv",full.names = T)
res <- vector("list")
for (i in seq_along(files)){
  res[[i]] <- read.csv(files[i])
}
res <- dplyr::bind_rows(res)
##也可以使用 data.table 的 rbindlist 函数
##res <- data.table::rbindlist(res)
能用 for 循环的地方就可以使用 apply 簇函数进行替代简化:
library(dplyr)
files <-  list.files("test/",pattern="*.csv",full.names = T)
res <- lapply(files, read.csv) %>%
  bind_rows(.)
也可以使用 do.call 结合 rbind 直接将读入的数据按行合并:
files <-  list.files("test/",pattern="*.csv",full.names = T)
res <- do.call(rbind,lapply(files,read.csv))
如何在 Shell 中并行
首先需要安装 GNU parallel:
wget http://ftp.gnu.org/gnu/parallel/parallel-latest.tar.bz2
tar xjf parallel-latest.tar.bz2
cd parallel-20211022/
./configure --prefix=$HOME
make
make install
最简单的使用方法就是:cat list | parallel do_something | process_output,可以通过 -j 参数来指定需要调用的核数:
#!/bin/bash
for line in `cat /home/wt/common_driver/data/hla.txt`
do
  hla=$(echo $line | awk -F',' '{print $1}')
  hla_alt=$(echo $line | awk -F',' '{print $2}')
  cat /home/wt/common_driver/data/pep8/files | parallel -j 15 netMHCpan -p /home/wt/common_driver/data/pep8/split/{} -BA -l 8 -xls -a $hla -xlsfile /home/wt/common_driver/data/pep8/results/${hla_alt}_{}.xls
done
Shell 如何按行把文件拼起来
使用 column 命令:paste file1 file2 | column -s $'\t' -t, -s 表示分割符column(1): columnate lists - Linux man page (die.net)
启动 Rstudio-server 报错
先 rstudio-server stop 再 rstudio-server start 报错:

找到占用8787端口的进程,然后kill掉:
lsof -i tcp:8787
sudo kill -9 PID
接着重启 Rstudio 就可以了:
rstudio-server restart

安装 tensorflow 额外包 CURL_CA_BUNDLE 设置
install.packages("tensorflow")
tensorflow::install_tensorflow(extra_packages='tensorflow-probability')
报错:

安装官方的指示:
Hi, can you please follow the instructions on the Issue Template that, I believe, was presented to you when you filed the issue? Issue template reproduced here for convenience:
Many installation issues are resolved by running the following in a fresh R session (you can restart R in Rstudio with Ctrl+Shift+F10):
#installthedevelopmentversionofpackages,incasethe
#issueisalreadyfixedbutnotonCRANyet.
install.packages("remotes")
remotes::install_github(sprintf("rstudio/%s",c("reticulate","tensorflow","keras")))
reticulate::miniconda_uninstall()#startwithablankslate
reticulate::install_miniconda()
keras::install_keras()
Test to see if installation was successful.
tensorflow::as_tensor("HelloWorld")
If the above snippet succeeded and you saw something like tf.Tensor(b'Hello World', shape=(), dtype=string), then 🎉, you've successfully installed Tensorflow.
If the above installation failed, please gather some diagnostic info:
reticulate::py_config()
tensorflow::tf_config()
reticulate::import("tensorflow")
reticulate::py_last_error()
sessionInfo()
Please copy and paste the FULL OUTPUT of running all three snippets, and be sure to enclose the output lines with three backticks (```) for monospace formatting.
但是重新安装 conda 时出错:
> reticulate::install_miniconda()
* Installing Miniconda -- please wait a moment ...
* Downloading 'https://repo.anaconda.com/miniconda/Miniconda3-latest-Linux-x86_64.sh' ...
trying URL 'https://repo.anaconda.com/miniconda/Miniconda3-latest-Linux-x86_64.sh'
Error in download.file(url, destfile = installer, mode = "wb") :
  cannot open URL 'https://repo.anaconda.com/miniconda/Miniconda3-latest-Linux-x86_64.sh'
In addition: Warning message:
In download.file(url, destfile = installer, mode = "wb") :
  URL 'https://repo.anaconda.com/miniconda/Miniconda3-latest-Linux-x86_64.sh': status was 'Problem with the SSL CA cert (path? access rights?)'
查看这个函数:
> reticulate::install_miniconda
function (path = miniconda_path(), update = TRUE, force = FALSE)
{
    check_forbidden_install("Miniconda")
    if (grepl(" ", path, fixed = TRUE))
        stop("cannot install Miniconda into a path containing spaces")
    install_miniconda_preflight(path, force)
    message("* Installing Miniconda -- please wait a moment ...")
    url <- miniconda_installer_url()
    installer <- miniconda_installer_download(url)
    miniconda_installer_run(installer, update, path)
    ok <- miniconda_exists(path) && miniconda_test(path)
    if (!ok)
        stopf("Miniconda installation failed [unknown reason]")
    if (update)
        miniconda_update(path)
    conda <- miniconda_conda(path)
    python <- miniconda_python_package()
    conda_create("r-reticulate", packages = c(python, "numpy"),
        conda = conda)
    messagef("* Miniconda has been successfully installed at %s.",
        pretty_path(path))
    path
}
关键在于这3句:
url <- miniconda_installer_url()
installer <- miniconda_installer_download(url)
miniconda_installer_run(installer, update, path)
> url <- reticulate:::miniconda_installer_url()
> url
[1] "https://repo.anaconda.com/miniconda/Miniconda3-latest-Linux-x86_64.sh"

> reticulate:::miniconda_installer_download
function (url)
{
    installer <- file.path(tempdir(), basename(url))
    if (file.exists(installer))
        return(installer)
    messagef("* Downloading %s ...", shQuote(url))
    status <- download.file(url, destfile = installer, mode = "wb")
    if (!file.exists(installer)) {
        fmt <- "download of Miniconda installer failed [status = %i]"
        stopf(fmt, status)
    }
    installer
}
所以 miniconda_installer_download 返回的就是 miniconda 的 sh 文件的路劲,我们提供一下应该就可以了:
> path = miniconda_path()
> update = TRUE
> installer <- "/home/wt/software/Miniconda3-latest-Linux-x86_64.sh"
> reticulate:::miniconda_installer_run(installer, update, path)
PREFIX=/home/wt/.local/share/r-miniconda
Unpacking payload ...
Collecting package metadata (current_repodata.json): ...working... done
Solving environment: ...working... done

## Package Plan ##

  environment location: /home/wt/.local/share/r-miniconda

  added / updated specs:
    - _libgcc_mutex==0.1=main
    - _openmp_mutex==4.5=1_gnu
    - brotlipy==0.7.0=py39h27cfd23_1003
    - ca-certificates==2021.10.26=h06a4308_2
    - certifi==2021.10.8=py39h06a4308_2
    - cffi==1.15.0=py39hd667e15_1
    - charset-normalizer==2.0.4=pyhd3eb1b0_0
    - conda-content-trust==0.1.1=pyhd3eb1b0_0
    - conda-package-handling==1.7.3=py39h27cfd23_1
    - conda==4.11.0=py39h06a4308_0
    - cryptography==36.0.0=py39h9ce1e76_0
    - idna==3.3=pyhd3eb1b0_0
    - ld_impl_linux-64==2.35.1=h7274673_9
    - libffi==3.3=he6710b0_2
    - libgcc-ng==9.3.0=h5101ec6_17
    - libgomp==9.3.0=h5101ec6_17
    - libstdcxx-ng==9.3.0=hd4cf53a_17
    - ncurses==6.3=h7f8727e_2
    - openssl==1.1.1m=h7f8727e_0
    - pip==21.2.4=py39h06a4308_0
    - pycosat==0.6.3=py39h27cfd23_0
    - pycparser==2.21=pyhd3eb1b0_0
    - pyopenssl==21.0.0=pyhd3eb1b0_1
    - pysocks==1.7.1=py39h06a4308_0
    - python==3.9.7=h12debd9_1
    - readline==8.1.2=h7f8727e_1
    - requests==2.27.1=pyhd3eb1b0_0
    - ruamel_yaml==0.15.100=py39h27cfd23_0
    - setuptools==58.0.4=py39h06a4308_0
    - six==1.16.0=pyhd3eb1b0_0
    - sqlite==3.37.0=hc218d9a_0
    - tk==8.6.11=h1ccaba5_0
    - tqdm==4.62.3=pyhd3eb1b0_1
    - tzdata==2021e=hda174b7_0
    - urllib3==1.26.7=pyhd3eb1b0_0
    - wheel==0.37.1=pyhd3eb1b0_0
    - xz==5.2.5=h7b6447c_0
    - yaml==0.2.5=h7b6447c_0
    - zlib==1.2.11=h7f8727e_4


The following NEW packages will be INSTALLED:

  _libgcc_mutex      pkgs/main/linux-64::_libgcc_mutex-0.1-main
  _openmp_mutex      pkgs/main/linux-64::_openmp_mutex-4.5-1_gnu
  brotlipy           pkgs/main/linux-64::brotlipy-0.7.0-py39h27cfd23_1003
  ca-certificates    pkgs/main/linux-64::ca-certificates-2021.10.26-h06a4308_2
  certifi            pkgs/main/linux-64::certifi-2021.10.8-py39h06a4308_2
  cffi               pkgs/main/linux-64::cffi-1.15.0-py39hd667e15_1
  charset-normalizer pkgs/main/noarch::charset-normalizer-2.0.4-pyhd3eb1b0_0
  conda              pkgs/main/linux-64::conda-4.11.0-py39h06a4308_0
  conda-content-tru~ pkgs/main/noarch::conda-content-trust-0.1.1-pyhd3eb1b0_0
  conda-package-han~ pkgs/main/linux-64::conda-package-handling-1.7.3-py39h27cfd23_1
  cryptography       pkgs/main/linux-64::cryptography-36.0.0-py39h9ce1e76_0
  idna               pkgs/main/noarch::idna-3.3-pyhd3eb1b0_0
  ld_impl_linux-64   pkgs/main/linux-64::ld_impl_linux-64-2.35.1-h7274673_9
  libffi             pkgs/main/linux-64::libffi-3.3-he6710b0_2
  libgcc-ng          pkgs/main/linux-64::libgcc-ng-9.3.0-h5101ec6_17
  libgomp            pkgs/main/linux-64::libgomp-9.3.0-h5101ec6_17
  libstdcxx-ng       pkgs/main/linux-64::libstdcxx-ng-9.3.0-hd4cf53a_17
  ncurses            pkgs/main/linux-64::ncurses-6.3-h7f8727e_2
  openssl            pkgs/main/linux-64::openssl-1.1.1m-h7f8727e_0
  pip                pkgs/main/linux-64::pip-21.2.4-py39h06a4308_0
  pycosat            pkgs/main/linux-64::pycosat-0.6.3-py39h27cfd23_0
  pycparser          pkgs/main/noarch::pycparser-2.21-pyhd3eb1b0_0
  pyopenssl          pkgs/main/noarch::pyopenssl-21.0.0-pyhd3eb1b0_1
  pysocks            pkgs/main/linux-64::pysocks-1.7.1-py39h06a4308_0
  python             pkgs/main/linux-64::python-3.9.7-h12debd9_1
  readline           pkgs/main/linux-64::readline-8.1.2-h7f8727e_1
  requests           pkgs/main/noarch::requests-2.27.1-pyhd3eb1b0_0
  ruamel_yaml        pkgs/main/linux-64::ruamel_yaml-0.15.100-py39h27cfd23_0
  setuptools         pkgs/main/linux-64::setuptools-58.0.4-py39h06a4308_0
  six                pkgs/main/noarch::six-1.16.0-pyhd3eb1b0_0
  sqlite             pkgs/main/linux-64::sqlite-3.37.0-hc218d9a_0
  tk                 pkgs/main/linux-64::tk-8.6.11-h1ccaba5_0
  tqdm               pkgs/main/noarch::tqdm-4.62.3-pyhd3eb1b0_1
  tzdata             pkgs/main/noarch::tzdata-2021e-hda174b7_0
  urllib3            pkgs/main/noarch::urllib3-1.26.7-pyhd3eb1b0_0
  wheel              pkgs/main/noarch::wheel-0.37.1-pyhd3eb1b0_0
  xz                 pkgs/main/linux-64::xz-5.2.5-h7b6447c_0
  yaml               pkgs/main/linux-64::yaml-0.2.5-h7b6447c_0
  zlib               pkgs/main/linux-64::zlib-1.2.11-h7f8727e_4


Preparing transaction: ...working... done
Executing transaction: ...working... done
installation finished.
但是安装tensorflow::install_tensorflow(extra_packages='tensorflow-probability') 的时候还是有同样的错误,找了半天,原来是环境变量的问题:
usethis::edit_r_environ()
##把CURL_CA_BUNDLE=/opt/microsoft/ropen/4.0.2/lib64/R/lib/microsoft-r-cacert.pem给注释掉
接下来可以正常安装了:
tensorflow::install_tensorflow(extra_packages='tensorflow-probability')

> tensorflow::tf_config()
2022-03-03 19:34:09.642406: W tensorflow/stream_executor/platform/default/dso_loader.cc:64] Could not load dynamic library 'libcudart.so.11.0'; dlerror: libcudart.so.11.0: cannot open shared object file: No such file or directory; LD_LIBRARY_PATH: /home/data/R/R-4.1.0/lib::/lib:/usr/local/lib64:/usr/lib/jvm/java-1.8.0-openjdk-1.8.0.292.b10-1.el7_9.x86_64/jre/lib/amd64/server:/usr/local/lib
2022-03-03 19:34:09.642611: I tensorflow/stream_executor/cuda/cudart_stub.cc:29] Ignore above cudart dlerror if you do not have a GPU set up on your machine.
Loaded Tensorflow version 2.8.0
TensorFlow v2.8.0 (~/miniconda3/lib/python3.9/site-packages/tensorflow)
Python v3.9 (~/miniconda3/bin/python)

#devtools::install_github("Irrationone/cellassign") 网不行
BiocManager::install("scran")
install.packages("~/software/cellassign/",repos=NULL,type="source")
安装 magick 没有 Magick++.pc
在安装 UniprotR 时会安装依赖包 magick, 报错信息:
* installing *source* package ‘magick’ ...
** package ‘magick’ successfully unpacked and MD5 sums checked
** using staged installation
Package Magick++ was not found in the pkg-config search path.
Perhaps you should add the directory containing `Magick++.pc'
to the PKG_CONFIG_PATH environment variable
No package 'Magick++' found
Using PKG_CFLAGS=
Using PKG_LIBS=-lMagick++-6.Q16
--------------------------- [ANTICONF] --------------------------------
Configuration failed to find the Magick++ library. Try installing:
 - deb: libmagick++-dev (Debian, Ubuntu)
 - rpm: ImageMagick-c++-devel (Fedora, CentOS, RHEL)
 - csw: imagemagick_dev (Solaris)
 - brew imagemagick@6 (MacOS)
For Ubuntu versions Trusty (14.04) and Xenial (16.04) use our PPA:
   sudo add-apt-repository -y ppa:cran/imagemagick
   sudo apt-get update
   sudo apt-get install -y libmagick++-dev
If Magick++ is already installed, check that 'pkg-config' is in your
PATH and PKG_CONFIG_PATH contains a Magick++.pc file. If pkg-config
is unavailable you can set INCLUDE_DIR and LIB_DIR manually via:
R CMD INSTALL --configure-vars='INCLUDE_DIR=... LIB_DIR=...'
-------------------------- [ERROR MESSAGE] ---------------------------
<stdin>:1:10: fatal error: Magick++.h: No such file or directory
compilation terminated.
--------------------------------------------------------------------
ERROR: configuration failed for package ‘magick’
* removing ‘/home/data/public/R/library/magick’
Warning in install.packages :
  installation of package ‘magick’ had non-zero exit status
安装 ImageMagick:
yum install ImageMagick-devel ImageMagick-c++-devel
网不行,从源码安装:
git clone https://github.com/ImageMagick/ImageMagick.git ImageMagick-7.1.0
cd ImageMagick-7.1.0
编译:
sudo ./configure
[sudo] password for wt:
checking build system type... x86_64-pc-linux-gnu
checking host system type... x86_64-pc-linux-gnu
checking target system type... x86_64-pc-linux-gnu
checking for a BSD-compatible install... /bin/install -c
checking whether build environment is sane... yes
checking for a thread-safe mkdir -p... /bin/mkdir -p
checking for gawk... gawk
checking whether make sets $(MAKE)... yes
checking whether make supports nested variables... yes
checking whether UID '0' is supported by ustar format... yes
checking whether GID '0' is supported by ustar format... yes
checking how to create a ustar tar archive... gnutar
checking whether make supports nested variables... (cached) yes
Configuring ImageMagick 7.1.0-26
checking whether build environment is sane... yes
checking whether make supports the include directive... yes (GNU style)
checking for gcc... gcc
checking whether the C compiler works... no
configure: error: in `/home/data/public/ImageMagick-7.1.0-26':
configure: error: C compiler cannot create executables
See `config.log' for more details
查看 config.log 发现找不到共享库 error while loading shared libraries: libisl.so.15: cannot open shared object file,但是LD_LIBRARY_PATH已经添加了(这个库在 /usr/local/lib 中,这个路径已经是LD_LIBRARY_PATH了,但是就是找不到),采用第二种方法:
cat /etc/ld.so.conf
#include ld.so.conf.d/*.conf
#include /usr/local/lib
cd /etc/ld.so.conf.d
sudo me.conf
##把 /usr/local/lib 添加到me.conf
sudo ldconfig
然后就可以编译安装了:
sudo ./configure
sudo make
sudo make install
还是会报错,确实没有 Magick++.pc:
Perhaps you should add the directory containing `Magick++.pc'
pkg_config_path 环境变量设置 教程 - 付杰博客 (fujieace.com)
先用conda安装,然后把Magick++.pc所在的路径添加到PKG_CONFIG_PATH 环境变量(.Renviron)中:
conda install -c conda-forge imagemagick
cd miniconda3/
find Magick++.pc *
#./lib/pkgconfig/Magick++.pc
#./pkgs/imagemagick-7.0.11_14-pl5320hb118871_0/lib/pkgconfig/Magick++.pc
# bash 中 添加export PKG_CONFIG_PATH=/home/wt/miniconda3/lib/pkgconfig:$PKG_CONFIG_PATH
usethis::edit_r_environ()
#添加 PKG_CONFIG_PATH=/home/wt/miniconda3/lib/pkgconfig
install.packages("~/software/magick_2.7.3.tar.gz",repos=NULL,type="source")
如何使用 MobaXterm + jupyter lab 实现远程连接
-
jupyter-lab --generate-config生成配置文件 -
生成密码(进入 python,如果没有
notebook模块,需要先pip install notebook):from notebook.auth import passwd passwd() -
修改刚刚生成的配置文件:
c.ServerApp.allow_remote_access = True c.ServerApp.ip = '*' c.ServerApp.password = '刚刚生成的序列' -
后台运行 jupyter-lab:
nohup jupyter-lab --no-browser --port 8889 > jupyter.log 2>&1 &
接下来就可以使用 MobaXterm 进行端口转发,点击 Tunneling-New SHH tunnel

为了防止断连,可以在设置里面设定 ssh keepalive:

此时在浏览器中输入 http://localhost:8899/ 就可以访问服务器的 jupyter-lab 了。
如果输入密码提示错误的话,可以先 kill 掉 jupyter-lab 的进程,然后 jupyter-lab password 修改密码,然后重新启动。
如何删除文件中特定的列
[Deleting a Specific Line From a Text File in Command Line in Linux - SysTutorials](https://www.systutorials.com/how-to-delete-a-specific-line-from-a-text-file-in-command-line-on-linux/#:~:text=Deleting a Specific Line From a Text File in Command Line in Linux,-Posted on Mar&text=You can use the “stream,filtering and transforming text” sed.&text=Here%2C -i means edit the,%3B immediately start next cycle”.)
GEOquery 报错
在运行 getGEO 下载 GEO 数据集时报错:
Error in `.rowNamesDF<-`(x, value = value) : 'row.names'的长度不对
根据 Github 上的解决方法:Github issue,在运行这句代码之前加上:
readr::local_edition(1)
原因是 readr 的版本问题。
获取字符串长度时报错:invalid multibyte string
> nchar(alldb$CDR3_a)
Error in nchar(alldb$CDR3_a) : invalid multibyte string, element 1741
> alldb$CDR3_a[1741]
[1] "LGTGNQFYF<a0>"
> gsub("[<a0>]","",alldb$CDR3_a[1741])
[1] "LGTGNQFYF<a0>"
可以看到这个字符末尾有一个 <a0> ,在 Stackoverflow 上找到一个方法 issue:
> iconv(alldb$CDR3_a[1741],from="UTF-8", to="UTF-8", sub="")
[1] "LGTGNQFYF"
iconv 可以在不同的编码方式间进行转化,sub 参数就是将那些无法转化的字符转化成 sub 参数中的字符:
> iconv(alldb$CDR3_a[1741],from="UTF-8", to="UTF-8", sub="++")
[1] "LGTGNQFYF++"
获取指定版本的 Ensembl gene ID 和 symbol ID 的对应关系
比如想要获取 Ensembl V75 版本的对应关系来转化 ENST 的 gene ID 到 gene symbol:
-
进入 Ensembl 官网,在右边选择指定的版本:

-
选择下载

-
接着点击
Customise your download就可以进入 Biomart 的界面:
-
根据需要选择:


-
点击 result 输出 tsv 文件就行了
展示模型汇总表
使用 gtsummary 的 tbl_regression 的函数:
ibrary(gtsummary)
m1 <- glm(response ~ age + stage, trial, family = binomial)
tbl_regression(m1, exponentiate = TRUE)

更多可以参考文档。
展示混淆矩阵
使用 cvms R 包:
library(cvms)
d_binomial <- tibble("target" = rbinom(100, 1, 0.7),
                     "prediction" = rbinom(100, 1, 0.6))
basic_table <- table(d_binomial)##虽然用 table 也可以展示
basic_table

      prediction
target  0  1
     0 14 13
     1 29 44

cfm <- as_tibble(basic_table)
cfm

# A tibble: 4 × 3
  target prediction     n
  <chr>  <chr>      <int>
1 0      0             14
2 1      0             29
3 0      1             13
4 1      1             44

plot_confusion_matrix(cfm,
                      target_col = "target",
                      prediction_col = "prediction",
                      counts_col = "n")

服务器添加新硬盘挂载 (centos 7)
首先将 /etc/fstab 中原先的硬盘挂载给注释掉,接着插入新硬盘,使用 fdisk -l 查看新加入的硬盘:
fdisk -l

Disk /dev/sdd: 18000.2 GB, 18000207937536 bytes, 35156656128 sectors
Units = sectors of 1 * 512 = 512 bytes
Sector size (logical/physical): 512 bytes / 4096 bytes
I/O size (minimum/optimal): 4096 bytes / 4096 bytes
对于这种较大的硬盘,需要使用 parted 进行分区:
parted /dev/sdd ##进入分区界面
mklabel gpt##使用 gpt 分区
mkpart primary 0 -1 ##将全部容量建立一个分区
print ##打印分区信息
quit ##退出分区界面
分区完成之后需要对其进行格式化:
mkfs.xfs -f /dev/sdd
区别:1、单个文件的大小,EXT4可以是16GB到16TB,而XFS可以是16TB到16EB;2、最大文件系统大小,EXT4可以是1EB,而XFS是8EB;3、EXT4受限制于磁盘结构和兼容问题,可扩展性和scalability不如XFS
接下来就需要创建挂载点并进行挂载:
mkdir data_backup1
mount -t xfs /dev/sdd /home/data_backup1/
为了开机自动挂载,需要修改 etc/fstab 文件:
##加上,注意列之间是 tab 分割
/dev/sdd        /home/data_backup2      xfs     defaults        0       0
重启之后检查挂载:
df -hT

/dev/sdd                xfs        17T   34M   17T   1% /home/data_backup1
删除大量文件
Linux上删除大量文件几种方式对比 - Show_you - 博客园 (cnblogs.com) 比较快的方法是:
find . -type f|xargs rm -rf
多线程压缩
使用 pigz:
tar -cvf - /var/log | pigz -k -p 20 > logs.tar.gz
##解压
unpigz -d logs.tar.gz
tar -I pigz -xvf model_data.tar.gz
用 Latex 画神经网络示意图
\documentclass{article}

\usepackage{tikz}
\begin{document}
\pagestyle{empty}

\def\layersep{2.5cm}

\begin{tikzpicture}[shorten >=1pt,->,draw=black!50, node distance=\layersep]
    \tikzstyle{every pin edge}=[<-,shorten <=3pt]
    \tikzstyle{neuron}=[circle,fill=black!25,minimum size=25pt,inner sep=0pt]
    \tikzstyle{input neuron}=[neuron, fill=green!50];
    \tikzstyle{output neuron}=[neuron, fill=red!50];
    \tikzstyle{hidden neuron}=[neuron, fill=blue!50];
    \tikzstyle{annot} = [text width=4em, text centered]

    % Draw the input layer nodes
    \foreach \name / \y in {1,...,5}
    % This is the same as writing \foreach \name / \y in {1/1,2/2,3/3,4/4}
        \node[input neuron] (I-\name) at (0,-\y) {};

    % Draw the hidden layer nodes
    \foreach \name / \y in {1,...,3}
        \path[yshift=-1cm]
            node[hidden neuron] (H-\name) at (\layersep,-\y cm) {};

    % Draw the output layer node
    \node[output neuron, right of=H-2] (O) {};

    % Connect every node in the input layer with every node in the
    % hidden layer.
    \foreach \source in {1,...,5}
        \foreach \dest in {1,...,3}
            \path (I-\source) edge (H-\dest);

    % Connect every node in the hidden layer with the output layer
    \foreach \source in {1,...,3}
        \path (H-\source) edge (O);


\end{tikzpicture}
% End of code
\end{document}

解压如何丢弃目录层级
加上 --strip-components :
tar -xvf eg.tar --strip-components 1
后面接的数字表示去掉几个层级的目录(也就是去掉几个 /)
Centos 升级,切换 GCC 版本
###gcc 版本不够,升级到10
##切换源
mv /etc/yum.repos.d/CentOS-Base.repo /etc/yum.repos.d/CentOS-Base.repo.backup
cd /etc/yum.repos.d/
wget -O /etc/yum.repos.d/CentOS-Base.repo http://mirrors.aliyun.com/repo/Centos-7.repo
##在后面加上 https://forums.centos.org/viewtopic.php?t=76778
[ol7_software_collections]
name=Software Collection packages for Oracle Linux 7 ($basearch)
baseurl=http://yum.oracle.com/repo/OracleLinux/OL7/SoftwareCollections/$basearch/
gpgkey=file:///etc/pki/rpm-gpg/RPM-GPG-KEY-oracle
gpgcheck=1
enabled=1

yum makecache
yum clean all
yum makecache
yum -y update
##添加个Key https://logic.edchen.org/how-to-resolve-gpg-key-retrieval-failed-errno-14-curl-37-couldnt-open-file-etc-pki-rpm-gpg-rpm-gpg-key-oracle/
sudo wget http://public-yum.oracle.com/RPM-GPG-KEY-oracle-ol7 -O /etc/pki/rpm-gpg/RPM-GPG-KEY-oracle

sudo yum install devtoolset-9
scl enable devtoolset-9 bash ##没有用
##https://serverfault.com/questions/1002266/scl-enable-devtoolset-7-dosnt-do-anything
source /opt/rh/devtoolset-9/enable
编译时出现 undefined reference to `__strtof128_nan@GLIBC_PRIVATE'
/lib/../lib64/libm.so: undefined reference to `__strtof128_nan@GLIBC_PRIVATE'
参考 /lib/x86_64-linux-gnu/libm.so.6: undefined reference to `__strtof128_nan@GLIBC_PRIVATE‘_CDL_03的博客-CSDN博客 可能是由于 libm 和 libc 版本不一致:
(base) [wt@localhost lib]$ ls -lh /lib/../lib64/libc.so.6
lrwxrwxrwx 1 root root 12 Jan  7 04:20 /lib/../lib64/libc.so.6 -> libc-2.17.so
(base) [wt@localhost lib]$ ls -lh /lib/../lib64/libm.so.6
lrwxrwxrwx 1 root root 12 Jan 18 06:30 /lib/../lib64/libm.so.6 -> libm-2.29.so

sudo ln -s -f /lib/../lib64/libm-2.17.so /lib/../lib64/libm.so.6

(base) [wt@localhost lib]$ ls -lh /lib/../lib64/libc.so.6
lrwxrwxrwx 1 root root 12 Jan  7 04:20 /lib/../lib64/libc.so.6 -> libc-2.17.so
(base) [wt@localhost lib]$  ls -lh /lib/../lib64/libm.so.6
lrwxrwxrwx 1 root root 26 Feb  3 21:39 /lib/../lib64/libm.so.6 -> /lib/../lib64/libm-2.17.so
清理 SWAP 内存
手动清除或刷新Linux的Swap分区 - EasonJim - 博客园 (cnblogs.com)
swapoff -a && swapon -a
改变内存进入 SWAP 的频率:内存还剩余很多,却使用 swap 分区 - 腾讯云开发者社区-腾讯云 (tencent.com)
swappiness=0的时候表示最大限度使用物理内存,然后才是 swap空间,swappiness=100的时候表示积极的使用swap分区,并且把内存上的数据及时的搬运到swap空间里面。
sudo echo "vm.swappiness=10" >> /etc/sysctl.conf
sudo sysctl -p
每一行加上相同的字符
sed -e 's/$/string after each line/' -i filename
列出某个时间之后产生的文件
find . -maxdepth 1 -newermt "2023-04-25 16:00" | grep "_feat.txt" | wc -l
-mmin 5 过去5min产生的文件
-mtime -1 过去 24小时产生的文件
How to get only files created after a date with ls? - Unix & Linux Stack Exchange
解压多个 tar.gz 文件
如果直接用 tar:
touch a b c
tar -zcvf a.tar.gz a
tar -zcvf b.tar.gz b
tar -zcvf c.tar.gz c

tar -zxvf *.tar.gz
tar: b.tar.gz: Not found in archive
tar: c.tar.gz: Not found in archive
tar: Exiting with failure status due to previous errors
需要结合 cat 和管道:
cat *.tar.gz | tar zxvf - -i
或者:
ls *.gz |xargs -n1 tar -xzf
清理高速缓存
free -h
              total        used        free      shared  buff/cache   available
Mem:          251Gi        34Gi       953Mi        90Mi       216Gi       215Gi
Swap:            0B          0B          0B
1、清理pagecache(页面缓存)
[root@localhost \~]echo 1 > /proc/sys/vm/drop\_caches 或者 [root@localhost \~] sysctl -w vm.drop_caches=1
2、清理dentries(目录缓存)和 inodes
[root@localhost \~]# echo 2 \> /proc/sys/vm/drop\_caches 或者 [root@localhost \~]# sysctl -w vm.drop_caches=2
3、清理pagecache、dentries 和 inodes
[root@localhost \~]# echo 3 \> /proc/sys/vm/drop\_caches 或者 [root@localhost \~]# sysctl -w vm.drop_caches=3
IO
iotop 可以用来查看进程的 IO 占用
sar 可以用来查看系统的性能,包括磁盘
sar -d -p 1 2
评论区